
Plan shifts in the weekly schedule
This is how you create services with a click, use templates and "until the end", and write daily notes.
The schedule shows a week: at the top is the Unassigned row for shifts without a staff member, below which is a row for each staff member with a position. Your team sees shifts from Unassigned as Open Shifts in the team area and can sign up for them. The header of each day shows the opening hours, with one row per opening time slot, for example, 11:30–14:30 and 17:30–23:00; days off and special closed days are grayed out and marked Closed. The week's key performance indicators are displayed above the schedule. Everything you plan is initially a draft. Your team will only see it once you publish the week.
Prerequisite: The scheduling feature is part of the Max plan and must be enabled. Scheduling is possible for the owner and anyone with the Manage Scheduling permission. You can only schedule people who are connected to your business.
Create a service
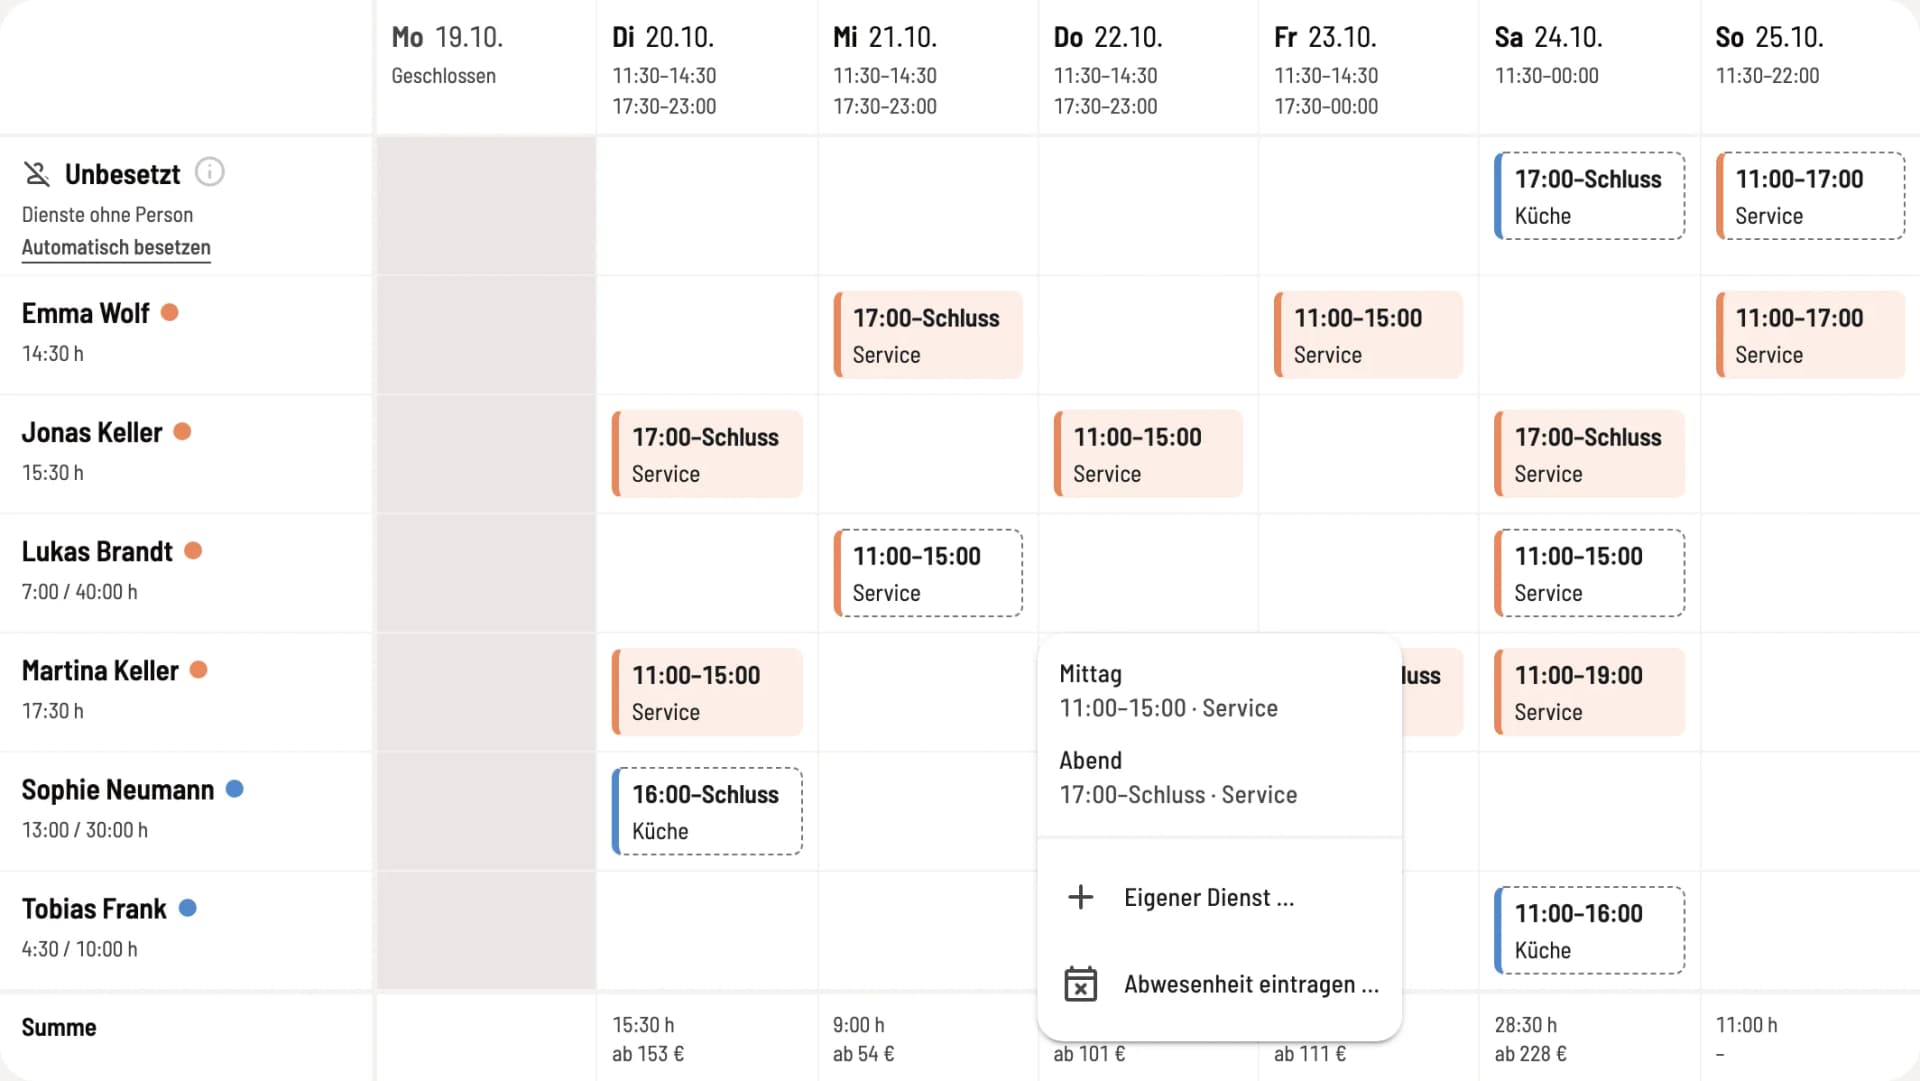
Step 1 of 2
Click in the cell
Open Employees → Schedule and select the week at the top: using the arrows, Today, or by clicking on the calendar week in the calendar. Click on a day in a person's row or in Vacant. A schedule template will then be created immediately in the menu. Custom Schedule… opens the Create Schedule window for a custom schedule, and Enter Absence… enters vacation or sick leave.
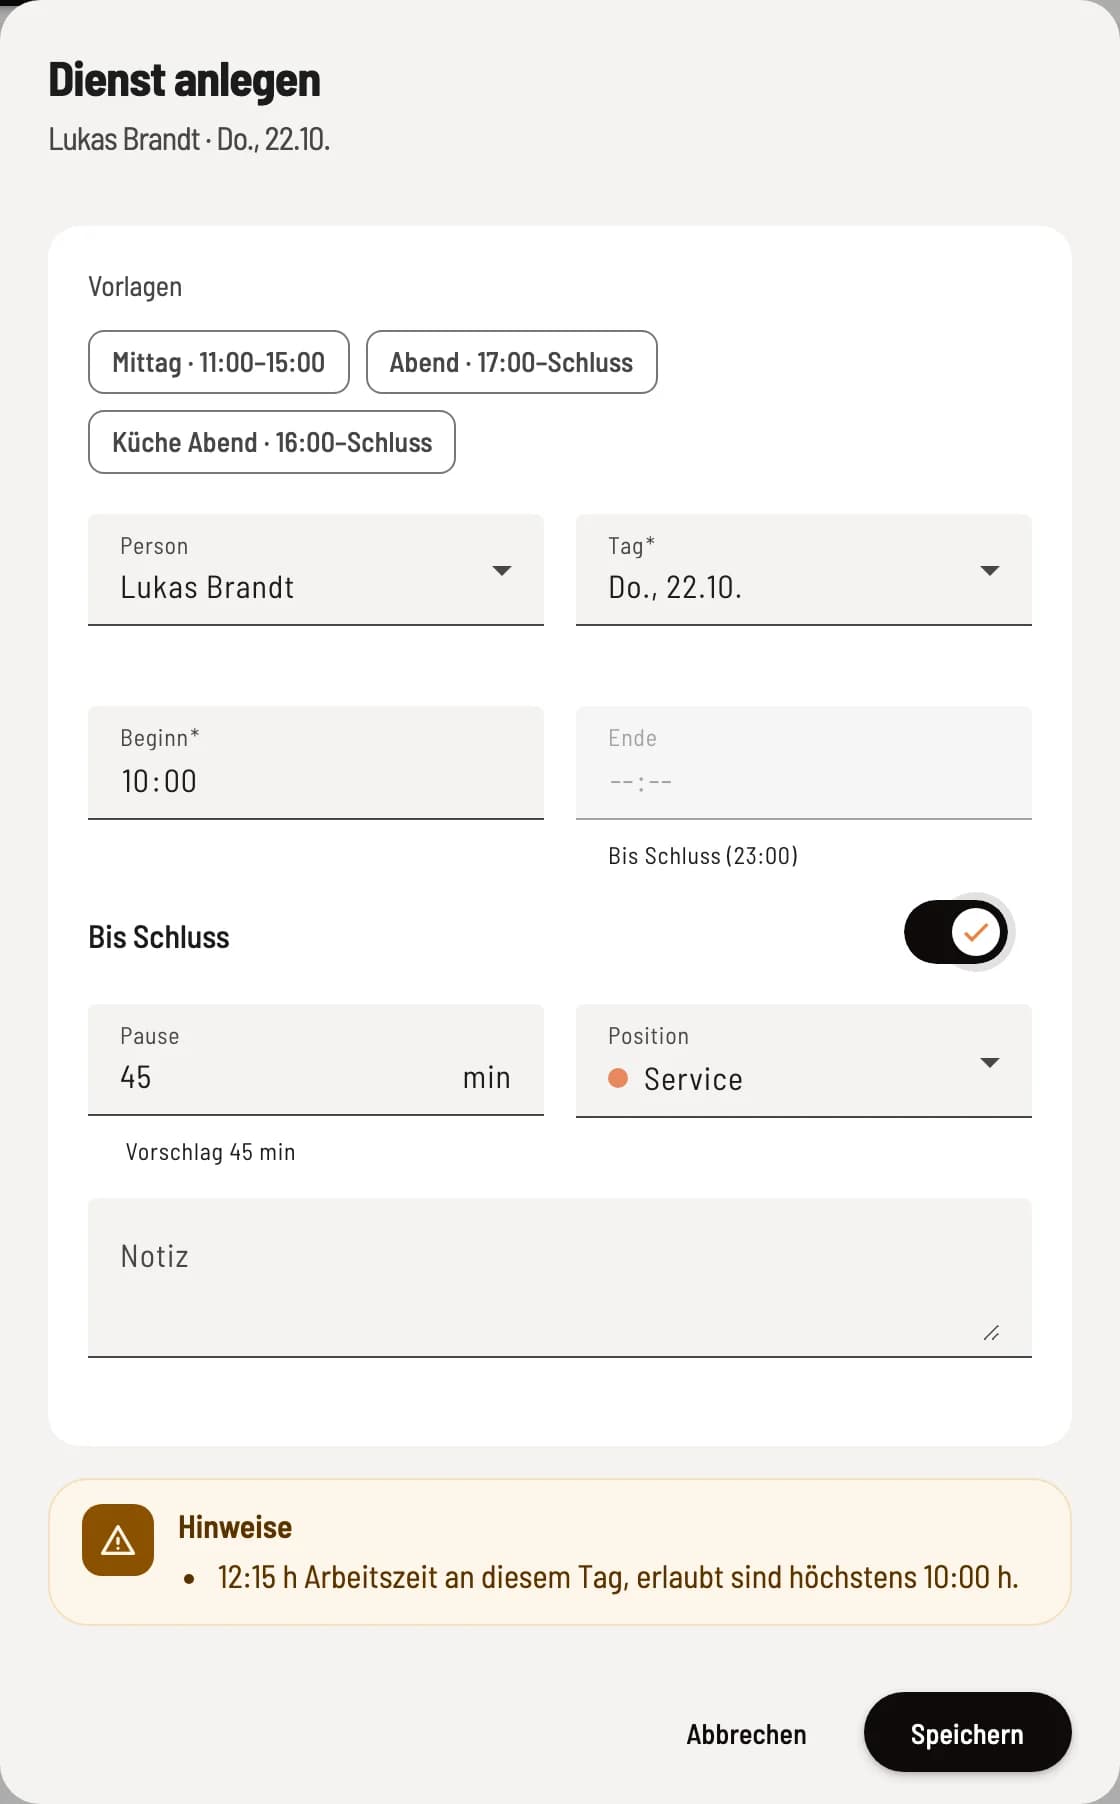
Step 2 of 2
Complete service
Enter Start and End or activate Until Closing: The shift will then end with the last closing time of the day, with an entry such as Until Closing (11:00 PM). The Break is suggested by the schedule according to your time tracking system's break rules, unless you have your own rules under the Working Time Act: 30 minutes for shifts over 6 hours, 45 minutes for shifts over 9 hours. You can also enter Personnel (without a personnel entry, the shift will be marked as Unstaffed), Day, Position, and a Note. You can copy the values from a template with a single click at the top. Warnings, such as those regarding insufficient rest time, will appear as you fill in the information.
Until closing extends until the last closing time of the day, as with automatic shifts. A lunch break does not end the shift: For opening hours 11:30–14:30 and 17:30–23:00, a shift starting at 10:00 ends at 23:00, not at 14:30. A shift that begins after midnight belongs to the previous day: If the bar is open until 02:00, a shift starting at 01:00 ends at 02:00. If a shift becomes too long as a result, a message regarding the daily maximum hours will appear.
You can change a service by clicking on it. Drag it with the mouse to a different day or to a different person. If you hold down Alt (Mac: Option) while releasing the mouse button, a copy is created. On a touchscreen, press and hold the service briefly before dragging. In the service window, Copy to… creates a copy on a different day of the week.
Delete and restore service
Delete in the service window removes it; at the bottom, it briefly displays Service removed with Undo. A service that has already been published remains crossed out until you send the changes. Clicking on it opens Restore service?; Restore returns it to the schedule as your team knows it. On a mobile device, tap it in the day list; on a keyboard, use the cell menu.
What the plan shows
Colored area: a published service. The color and bar on the left indicate the location. The time is shown at the top, for example 10:00–20:00 or 17:00–00:00, and the location is shown below in the People view.
White with a dashed edge: a draft that your team cannot yet see, whether new or changed. Strikethrough: a published service that you have removed. It will only disappear from your team's view once you submit the changes.
Symbol on duty: a notice, for example regarding rest periods or youth protection. Understanding the meaning of the notices in the duty roster is explained.
Colored dot with text on duty, approximately 12 minutes late or did not appear: deviation from the stamped time, see personnel costs and sales forecast in the duty roster.
Hatched area: The person has entered "cannot" for this time; the day will show Cannot, with specific times included. A fixed day off is shown as free, a requested day off as requested day off.
Line header, for example 32:00 / 40:00 h: planned hours of the week and weekly target in hours and minutes, alongside characteristics such as minijob, on-call or under 18.
18:00–End: a shift until the end. If the grid is too narrow for the whole week, it says from 18:00; the full details are shown when you hover your mouse over it.
You can switch between views using the People and Positions options at the top of the plan. In Positions, each position is a colored band spanning the entire width, with color bars and a summary such as 2 People · 6:30 PM, indicating the planned hours for that position. Below this are its own Vacant row and the names of the people assigned to that position.
Below the grid, a line explains the currently visible markers; the info icon at the top of the plan explains all of them. Below this are people without positions, for example, Hidden without position: Anna, Ben. Clicking on a name directly opens the person's shift schedule details, including positions, fixed days off, and vacation time; once they have a position, they appear in the plan.
Service templates
You can create frequently used shifts via the gear icon under Shift Settings → Shift Templates: Name, Start Time, End Time or Until End, Break Time in minutes, and optionally a Position. The templates will then be available in the menu of each cell in the schedule.
Daily notes
Using the pencil icon to the right of the date at the top of a day's page, you can write a daily note for your team, such as "Wedding from 6 PM onwards". The team will see it as soon as you send the changes. Leaving it blank deletes it. Below the opening hours, the day's page header displays the title of any special day and the daily note.
On the mobile phone
On smaller screens, select a day at the top to see a list of its shifts and absences. Tapping opens an entry. Below, you can create new shifts using Create Shift and Enter Absence; select the person in the window. If you're viewing a different week, the calendar icon next to the arrows will take you back to today.
Use Until Closing for evening shifts. If you later change the opening hours, the draft will adjust. Published shifts retain the time that was valid at the time of publication.